Well actually I wanted to blog about something else, (a subject I wanted to talk about long ago), but I wasn't planning to even on my comp today cus I'm getting really obsessed with my laptop (roll eyes)
And y'know I'm being serious, like today I woke up at 10am and I was like "okay mum is still sleeping, maybe I should on my comp?" but it's too crazy so I cancel that idea lol.
Okay anyway, this is gonna be a short blog post too. I'll probably do the long one when I settle down in my Uni or maybe next week after I'm all done with what I need to bring to for my new life (which basically is my whole room la)
So today I'm gonna talk about my first attempt of making my own bow.
I was scrolling through Bethany's video on youtube the other day and I came across one of her video: http://www.youtube.com/watch?v=9Or3QTBmIKw
And it's DIY Hair Bows!
In case you didn't know, I LOVE LOVE LOVE bows a lot!
Like bows are one of the must buy when I go shopping.
And I decided to give it a try as it seems pretty easy ^^
So today my mum and I went to shop for more stuff that I'll need for my university and I told her I wanna buy glue gun and try making bows and we bought!
But I forgot to buy drapery & clip opps :/
Managed to get my drapery after a while but still forgot my clip uh wtf.
Here are my drapery choice and they're not cheap as I thought eh. Got these 3 for NT$100.
And I decided to start with the plain yellow one cus it's gonna be my first ever bow so it's okay to "waste" the plain one right?
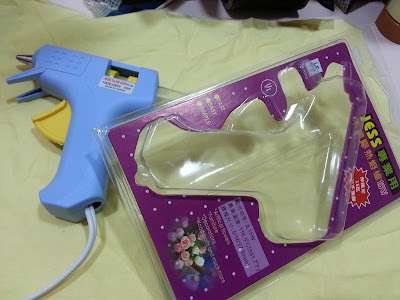
And this is the small glue gun I got for NT$120 which is acceptable. (BUT WHY NO PINK!!)
And it looks really crumple...
I couldn't find the flatiron so decided to use hair dryer as replace.
A small tip for you guys, if you wanna iron small pieces of cloth or what-so-ever but don't have flatiron with you, you can actually use hair dryer. (Though flatiron serve better)
And this is how it looks after you blow it. See, it's not as crumple as it was at the start.
(Oh and I folded it before I took pic that's why there's folded mark)
Now, let's check out the final look of the bow that I made! (*drum-roll please*)
Tada! Here it is!
Okay I know it looks ugly but c'mon it's my first attemp...
Practice makes perfect right? ;)
I'll definitely be making more in the future, but I was pretty excited to share this with you guys so right after I made this, I decided to blog it up~
And this is really stupid, but I burn my hand after I made the bow xD
I forgot to unplug before I clean my glue gun.
My mum was like "I was just telling you to be careful and you still burn yourself! See la don't listen to me la?" And I'm like oh well.
Moral of the story: Always listen to your mum. (I've learn that the hard way)
Oh and the bow is pretty big. Guess it'll only be suitable to pin at the back of your hair like when you tie a ponytail. (Normally I pin them beside my bangs but this is too huge to pin beside lol)
But you can always adjust the size you want yourself, just make it smaller x)
Look at the difference. The two pink bows are what I normally pin so it shows that the yellow one is way bigger lol.
So I've come to the end of the blog post.
Whoever loves bow just like me should feel lucky that I wrote this blog post and share Bethany's DIY video with you girls because normally I'm just a selfish bitch who refuse to tell others how I made/got my stuff from xDDD
But I'm a good person at times, like today. So decided to share with you girls~ (pretty sure this blog post only attract girls, well most of my blog posts attract girls only haha)
As usual, if you have any question please feel free to ask me at ask.fm/heatherlin
And if you have any comment, please comment there too :)
Hope to see you guys soon! xxx
p.s/ Currently listening to Maddi Jane's cover of Skyscraper (Original by Demi Lovato). Always love this song cus the lyrics is very encouraging and the melody is very nice as well. Anyway just wanted to share with you guys that her cover of this song is great!
You can take everything I have
You can break everything I am
Like I'm made of glass
Like I'm made of paper
Go on and try to tear me down
I will be rising from the ground like a skyscraper
Like a skyscraper
You can break everything I am
Like I'm made of glass
Like I'm made of paper
Go on and try to tear me down
I will be rising from the ground like a skyscraper
Like a skyscraper


